Resurrecting the Vintage Spider Web Quilt
- Madeleine Drake Vail
- Jul 15, 2022
- 4 min read

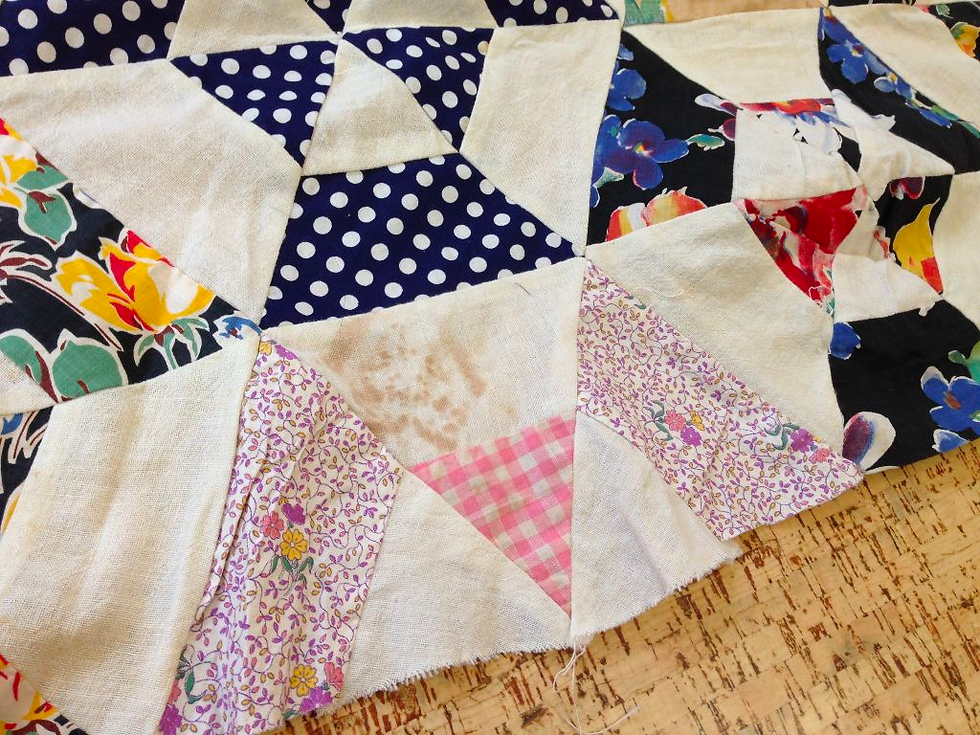
Several years ago, a friend of mine hosted our monthly meeting of the north Routt Bookies, our neighborhood book club. After the meeting was over, she asked me to look at an old quilt top that she had found in her attic. It was a dark winter night, without much light to see the quilt top with, so I took it home and looked it over the following morning. It was not in good shape - it was wrinkled and rumpled and worn and torn and stained. The quilt top did not lay flat, of course due to the wrinkles, but also because the blocks were not cut quite right to begin with. Each one had a bit of a peak in the middle. I talked with my friend and explained that it could be salvaged, but that it would be a project that I would have to work on slowly over time. She understood, and we agreed that I would start the process.

I researched the quilt block pattern, and found out that the name of the block is Spider Web. The blocks are composed of six equilateral triangles, which are joined to form hexagon shapes. Each triangle consists of two sections. One of the sections is a printed, colorful fabric, and the other section is an unbleached cotton fabric which was identified for me as old sugar sack fabric. The printed fabrics appear to be 1940's to 1960's dress fabric scraps, all cotton, except for one that I could not identify. I recognized one of the cotton prints as a fabric that my mother had made a dress out of and wore when I was a little girl!


There were two blocks that were not salvageable, the unidentifiable fabric having almost totally disintegrated over the years. I attended the American Society quilt show in Paducah, Kentucky, in 2016, and at the show I was able to purchase four pieces of vintage fabric, which I thought blended well with the other fabrics in the quilt top. I used one of those fabrics to replace the damaged pieces in the two quilt blocks, two of them to fill in the ends of the horizontal rows of the quilt, and one to bind the finished quilt.


The salvation and reconstruction of the quilt top was quite involved. To begin, I took apart the rows, then took apart the triangles from each other. I did not take apart the two sections of each triangle; the original stitching remains in those seams. The quilt top had been put together with a combination of hand and machine stitching. I then hand-washed all of the triangles, and also treated them for the stains. After they air-dried on my cutting table, I pressed them flat. At this point, I could see that I would need to trim the triangles to the proper shape so that when I stitched them back together, they would lay flat this time. In addition to trimming off excess bits of fabric, there were places that were quite frayed, which I reinforced with lightweight fusible interfacing. This was mostly confined to the seam allowances, which will now be much more stable.


I took pictures throughout the process so that I could be sure to reassemble the quilt top exactly as it had been before I took it apart. I stitched each row of triangles together, then stitched the rows together, adding in the filler triangles at the ends of each row. When the quilt top was in one piece again, I saw that there were a few places where the stains had not come out that I felt were a little too obvious. Washing the pieces definitely brightened the whole thing up, but some of those age spots just don't come out. So, in six places, I covered up the darker stains with a floral appliqué, cut from one of the vintage fabrics that I I had purchased in Paducah. I hand-stitched the appliqués, turning in the raw edges. The appliqués are not invisible, but are definitely hard to see in the jumble of prints. I think it's a rather charming way to solve the problem, and wouldn't hesitate to do the same on a quilt of my own.

Next, I quilted the quilt on my long-arm quilting machine, all hand-guided free-motion stitching with a bit of ruler work. I used 100% cotton Warm & Natural batting inside, and 100% cotton muslin for the backing. Each of the hexagons has an old-fashioned feather wreath quilted on it, and on the ends of the rows, I filled in the triangles with straight lines.

The binding of the quilt is made with one of the vintage fabrics from Paducah, a striped one, cut on the bias. The binding is a double layer, made with a technique intended to be of the highest quality and durability. I made a hanging sleeve for the top back of the quilt. To preserve the fabrics, I suggested that the quilt be displayed out of direct sunlight, with either very light use, or hung on a wall or quilt rack for decorative purposes.

Unfortunately, my friend did not know who made the quilt top, or exactly when it was made. She told me that it was someone on her husband's side of the family, so on the label, I left a space to fill in the name of the maker, date and where it was made if that information ever becomes available. I certainly enjoyed the project, and it came out better than I expected! I hope the family enjoys it for many years to come!


Comments